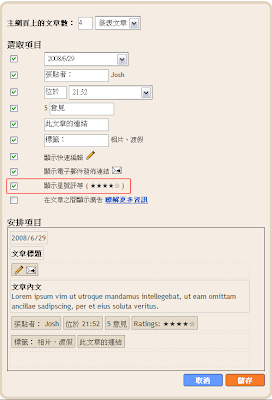
首先還是先登入draft.blogger.com,點選「版面配置」–「網頁元素」,編輯「網誌文章」,選取「顯示星號評等」後儲存。

儲存後,先檢視一下你的Blog,看看是否有出現如下圖的Star Ratings,如果沒有就必須手動加入程式碼。
 至於手動加入的步驟,Josh在這示範的是加在文章底部,文章底部有三個區塊,分別是<div class='post-footer-line post-footer-line-1'>、<div class='post-footer-line post-footer-line-2'>、<div class='post-footer-line post-footer-line-3'> ,由你自己決定要放在那:
- 尋找上述三個區塊其中一個
- 將下列程式碼放在你想放置的區塊內
<span class='star-ratings'>
  <b:if cond='data:top.showStars'>
     <div expr:g:background-color='data:backgroundColor' expr:g:text-color='data:textColor' expr:g:url='data:post.absoluteUrl' g:height='42' g:type='RatingPanel' g:width='180'/>
  </b:if>
</span> - 尋找<b:include name='feedLinks'/>
- 將下列程式碼放在<b:include name='feedLinks'/>的下方
<b:if cond='data:top.showStars'>
<script src='http://www.google.com/jsapi' type='text/javascript'/>
<script type='text/javascript'>
google.load("annotations", "1");
function initialize() {
google.annotations.setApplicationId(<data:top.blogspotReviews/>);
google.annotations.createAll();
google.annotations.fetch();
}
google.setOnLoadCallback(initialize);
</script>
</b:if> - 儲存範本
.star-ratings {
 float:right;
}
完工後,文章底部所承現的樣子就如下圖。


