要使用Import/Export的功能,和其他新的測試功能一樣,一定要先登入draft.blogger.com,你也可以在登入draft.blogger.com後,在控制主頁右上角將「讓Blogger 測試區成為我預設的資訊主頁。」選取,往後不論登入draft.blogger.com或www.blogger.com都直接進到draft.blogger.com。


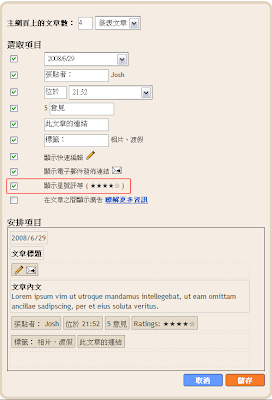
<span class='star-ratings'>
<b:if cond='data:top.showStars'>
<div expr:g:background-color='data:backgroundColor' expr:g:text-color='data:textColor' expr:g:url='data:post.absoluteUrl' g:height='42' g:type='RatingPanel' g:width='180'/>
</b:if>
</span>
<b:if cond='data:top.showStars'>
<script src='http://www.google.com/jsapi' type='text/javascript'/>
<script type='text/javascript'>
google.load("annotations", "1");
function initialize() {
google.annotations.setApplicationId(<data:top.blogspotReviews/>);
google.annotations.createAll();
google.annotations.fetch();
}
google.setOnLoadCallback(initialize);
</script>
</b:if>
.star-ratings {
float:right;
}
<p class='comment-footer'>
<a expr:href='data:post.addCommentUrl' expr:onclick='data:post.addCommentOnclick'><data:postCommentMsg/></a>
</p>
<p class='comment-footer'>
<b:if cond='data:post.embedCommentForm'>
<b:include data='post' name='comment-form'/>
<b:else/>
<b:if cond='data:post.allowComments'>
<a expr:href='data:post.addCommentUrl' expr:onclick='data:post.addCommentOnclick'><data:postCommentMsg/></a>
</b:if>
</b:if>
</p>
<b:includable id='comments' var='post'>
<div class='comments' id='comments'>
<a name='comments'/>
<b:if cond='data:post.allowComments'>
<!-- jackbook.com part 1 start -->
<!--
<h4>
<b:if cond='data:post.numComments == 1'>
1 <data:commentLabel/>:
<b:else/>
<data:post.numComments/> <data:commentLabelPlural/>:
</b:if>
</h4>
-->
<div class='onepx'>
<dl id='comments-block' style='height: 1px;overflow:hidden;'>
<b:loop values='data:post.comments' var='comment'>
<dt class='comment-author' expr:id='"comment-" + data:comment.id'>
<a expr:name='"comment-" + data:comment.id'/>
<b:if cond='data:comment.authorUrl'>
<a expr:href='data:comment.authorUrl' rel='nofollow'><data:comment.author/></a>
<b:else/>
<data:comment.author/>
</b:if>
<data:commentPostedByMsg/>
</dt>
<dd class='comment-body'>
<b:if cond='data:comment.isDeleted'>
<span class='deleted-comment'><data:comment.body/></span>
<b:else/>
<p><data:comment.body/></p>
</b:if>
</dd>
<dd class='comment-footer'>
<span class='comment-timestamp'>
<a expr:href='"#comment-" + data:comment.id' title='comment permalink'>
<data:comment.timestamp/>
</a>
<b:include data='comment' name='commentDeleteIcon'/>
</span>
</dd>
</b:loop>
</dl>
</div>
<!--
<p class='comment-footer'>
<a expr:href='data:post.addCommentUrl' expr:onclick='data:post.addCommentOnclick'><data:postCommentMsg/></a>
</p>
-->
<!-- jackbook.com part 1 ends -->
<!-- actually i almost do nothing with your template, just add that comment, you did it :) -->
<div id='comment-parent' onmouseover='showcomment("hoverme", "comment-child");' style='margin-bottom: 50px;'>
<h3 id='hoverme' style='display:block;'>
<img alt='Your cOmment"s Here! Hover Your cUrsOr to leave a cOmment.' src='http://img229.imageshack.us/img229/5559/htmlcodeleavecommentfi5.gif' title='Your cOmment"s Here! Hover Your cUrsOr to leave a cOmment.'/>
</h3>
<!-- this iframe below is your comment form. you can change the height, or add more style property into it -->
<div id='comment-child' style='border:none; display: none; height:750px; width: 440px; margin-bottom: 5px; background: #fff none; border: 1px solid #FCO;'>
<iframe expr:src='data:post.addCommentUrl' height='100%' scrolling='yes' style='border:none;' width='100%'/>
<br/>
<a href='http://www.jackbook.com/2007/06/how-to-make-readers-leave-comment.html' title='Want to have this on your blogger/blogspot?'>Comment Form under post in blogger/blogspot</a>
</div>
<!-- end of iframe -->
</div>
</b:if>
<div id='backlinks-container'>
<div expr:id='data:widget.instanceId + "_backlinks-container"'>
<b:if cond='data:post.showBacklinks'>
<b:include data='post' name='backlinks'/>
</b:if>
</div>
</div>
</div>
</b:includable>
<p class='comment-footer'>
<a expr:href='data:post.addCommentUrl' expr:onclick='data:post.addCommentOnclick'><data:postCommentMsg/></a>
</p>
<div id='comment-footer'>
<p class='comment-footer'>
<a onclick='showcomment("comments-block", "comment-child", "comment-footer");' style='cursor:pointer'><data:postCommentMsg/></a>
</p>
</div>
<!-- this iframe below is your comment form. you can change the height, or add more style property into it -->
<div id='comment-child' style='border:none; display: none; height:750px; width: 475px; margin-bottom: 15px; background: #ffffff none; border: 1px solid #FCO;'>
<iframe expr:src='data:post.addCommentUrl' height='100%' scrolling='yes' style='border:none; overflow-x:hidden;' width='100%'/>
<br/>
<div style='text-align:right;'>
<a onclick='closecomment("comments-block", "comment-child", "comment-footer");' style='cursor:pointer;'>關閉表單</a></div><br/>
</div>
<!-- end of iframe -->
<!-- www.jackbook.com -->
<!-- this to hide and show el -->
<script languange='javascript'>
function showcomment(a,b){
var jackbookdotcom = document.getElementById(a);
jackbookdotcom.style.display = 'none';
jackbookdotcom = document.getElementById(b);
jackbookdotcom.style.display = 'block';
}
</script>
<!-- www.jackbook.com -->
<script languange='javascript'>
function showcomment(a,b,c){
var showcommentfrom = document.getElementById(a);
showcommentfrom.style.display = 'none';
showcommentfrom = document.getElementById(b);
showcommentfrom.style.display = 'block';
showcommentfrom = document.getElementById(c);
showcommentfrom.style.display = 'none';
}
function closecomment(a,b,c){
var closecommentfrom = document.getElementById(a);
closecommentfrom.style.display = 'block';
closecommentfrom = document.getElementById(b);
closecommentfrom.style.display = 'none';
closecommentfrom = document.getElementById(c);
closecommentfrom.style.display = 'block';
}
</script>
<span class='post-comment-link'>
<b:if cond='data:blog.pageType != "item"'>
<b:if cond='data:post.allowComments'>
<a class='comment-link' expr:href='data:post.addCommentUrl' expr:onclick='data:post.addCommentOnclick'>
<b:if cond='data:post.numComments == 1'>1
<data:top.commentLabel/><b:else/><data:post.numComments/>
<data:top.commentLabelPlural/>
</b:if></a>
</b:if>
</b:if>
</span>
<span class='post-comment-link'>
<b:if cond='data:blog.pageType != "item"'>
<b:if cond='data:post.allowComments'>
<a class='comment-link' expr:href='data:post.url + "#comments"' >
<b:if cond='data:post.numComments == 1'>1
<data:top.commentLabel/><b:else/><data:post.numComments/>
<data:top.commentLabelPlural/>
</b:if></a>
</b:if>
</b:if>
</span>
<select onchange='javascript:location.href=this.options[this.selectedIndex].value;'>
<option>Select a Link</option>
<b:loop values='data:links' var='link'>
<option expr:value='data:link.target'><data:link.name/></option>
</b:loop>
</select>
延伸閱讀:
將Link改為下拉式選單
We know that some bloggers currently use future post dates in order to keep one post at the top of their blog for a while. Though we recommend that you use a Text page element for this, you can still get this old behavior with just one additional step. First, publish your post with the current date and time. This will publish it to your blog. Then, once it’s published, edit the post to change the date to the future and publish it again. We don’t re-schedule posts that are already published, so the post will stay on your blog but sort to the very top.
As with published posts, the post editor does not autosave scheduled posts if you go back and edit them. You wouldn’t want the post to publish while you’re in the middle of editing it! You can save the scheduled post as a draft to remove the scheduling and this will turn autosave back on.
UpData:早上抽空上來看這一篇,發現到標題的連結沒作用,不會連結到文章內部,這應該算是測試中的Bug,將來正式推出後應該會修正。這個Bug已於03/06修正。
.blog-feeds{
display :none;
}
.blog-feeds, .post-feeds{
display :none;
}
相關網站:
您好:記得在去年二月,AdSense Referrals曾有過重大的更新:
這封信旨在通知您關於 AdSense 產品推薦連結的重要資訊。 為了儘可能替發佈者製造更多收益機會,我們不斷努力實驗新的強化收益功能,同時也調整已提供給發佈者的產品。 這次要調整的是引導訪客申請 AdSense 的推薦連結組。 根據過去一年來對這個計劃所進行的實驗,我們認為對您所在地區的 發佈者來說,許多其他產品都比此計劃更有價值。 因此,我們將在數週內停止提供 AdSense 計劃的推薦連結組。 其他產品和服務的推薦連結則不會受到影響。
如果您目前在網站上顯示推薦連結組來引導使用者申請 AdSense,請參閱下列詳細資訊,以瞭解接下來數週會有什麼變化。
從 1 月初開始,您的帳戶中不會再顯示新增推薦連結組以引導使用者到 AdSense 產品的選項。 您現有的所有推薦連結會繼續累積至最多美金 $100 元的收益,直到 1 月底,這個計劃就會完全停用, 但現有的推薦連結會繼續在您的網頁上出現。
您必須在 1 月底前將所有引導使用者到 AdSense 的推薦連結從您的網頁上移除。 沒有移除的推薦連結會繼續如常顯示在您的網頁上,但轉換將不會記錄下來。 建議您將 AdSense 推薦連結換成其他產品或服務的推薦連結,或換成額外的廣告組。
感謝您過去推薦 AdSense 給其他使用者。 對於這個消息可能造成的任何不便,我們謹此致歉。
祝 商祺
Google AdSense 小組敬上
關于1月份之后 AdSense 推薦費用,若您推薦的用戶是位于北美、拉美和日本,發生在這些地區的每一個成功的轉換,我們都會支付給您100美金。這些地區之外的轉,都不會給您帶來收益。看樣子AdSense的推薦連結該拿掉了。另外,我們之前提到,1月之后 AdSense 推薦會從您的帳戶中消失。但是當您選擇定投的區域是北美、拉美和日本時,您會看到這個推薦連結會出現在您的帳戶中。不過,只有真正來自這些國家的用戶點擊了您的推薦,并產生成功的轉換,您才會獲得收益。
disp = disp + '<a href="javascript:updatePost(' + i + ');">' + entry.title.$t + '</a><br/><br/>';
disp = disp + '<a href="' + postPermalink[i] + '">' + postTitle[i] + '</a><br/>';
儲存後,將Neo.js傳至網路空間(例如:Google Page Creator),並將下列程式片段加載到Template中的</head>上方:<script language='javascript' src='http://joshnotepage.googlepages.com/Neo.js'/>
<!-- configurable parameter to control the number of posts in the second column of Neo -->
<script language='javascript'>
var numPosts = 10;
</script>
上方紅色字的程式位址請務必要改,因為上面那是我編的,而“numPosts = 10”則是要在Recent Posts所顯示的文章數,這裡的設定是10篇,可以自行設定。<a expr:href='data:label.url'><data:label.name/></a>
<a expr:href='"javascript:fetchLatestPosts(\"" + data:blog.homepageUrl + "\",\"" + data:label.name + "\");"'><data:label.name/></a>
<b:widget id='Posts' locked='false' title='Posts' type='HTML'>
<b:includable id='main'>
<DIV id='LabelDisplay'>
<DIV id='LabelTitle'>
</DIV>
<DIV class='widget-content' id='LabelPosts'>
<SCRIPT language='javascript'>fetchLatestPosts('<data:blog.homepageUrl/>', '');</SCRIPT>
</DIV>
</DIV>
</b:includable>
</b:widget>
儲存Template後,你就會擁有Neo中的Recent Posts及Label Post功能了。我之所以會想把這二個功能做移植,主要還是看上其中的“文章導覽切換”,當同一Label的文章超過你所設定顯示的篇數,還能以“Newer”和“Older”來做切換,這是一般Recent Posts所沒有的。原始文章出處:
a comment form under post in blogger - like wordpress comment style.
<b:includable id='comments' var='post'>
<div class='comments' id='comments'>
<a name='comments'/>
<b:if cond='data:post.allowComments'>
<h4>
<b:if cond='data:post.numComments == 1'>
1 <data:commentLabel/>:
<b:else/>
<data:post.numComments/> <data:commentLabelPlural/>:
</b:if>
</h4>
<dl id='comments-block'>
<b:loop values='data:post.comments' var='comment'>
<dt class='comment-author' expr:id='"comment-" + data:comment.id'>
<a expr:name='"comment-" + data:comment.id'/>
<b:if cond='data:comment.authorUrl'>
<a expr:href='data:comment.authorUrl' rel='nofollow'><data:comment.author/></a>
<b:else/>
<data:comment.author/>
</b:if>
<data:commentPostedByMsg/>
</dt>
<dd class='comment-body'>
<b:if cond='data:comment.isDeleted'>
<span class='deleted-comment'><data:comment.body/></span>
<b:else/>
<p><data:comment.body/></p>
</b:if>
</dd>
<dd class='comment-footer'>
<span class='comment-timestamp'>
<a expr:href='"#comment-" + data:comment.id' title='comment permalink'>
<data:comment.timestamp/>
</a>
<b:include data='comment' name='commentDeleteIcon'/>
</span>
</dd>
</b:loop>
</dl>
<p class='comment-footer'>
<a expr:href='data:post.addCommentUrl' expr:onclick='data:post.addCommentOnclick'><data:postCommentMsg/></a>
</p>
</b:if>
<div id='backlinks-container'>
<div expr:id='data:widget.instanceId + "_backlinks-container"'>
<b:if cond='data:post.showBacklinks'>
<b:include data='post' name='backlinks'/>
</b:if>
</div>
</div>
</div>
</b:includable>
<b:includable id='comments' var='post'>
<div class='comments' id='comments'>
<a name='comments'/>
<b:if cond='data:post.allowComments'>
<!-- jackbook.com part 1 start -->
<!--
<h4>
<b:if cond='data:post.numComments == 1'>
1 <data:commentLabel/>:
<b:else/>
<data:post.numComments/> <data:commentLabelPlural/>:
</b:if>
</h4>
-->
<div class='onepx'>
<dl id='comments-block' style='height: 1px;overflow:hidden;'>
<b:loop values='data:post.comments' var='comment'>
<dt class='comment-author' expr:id='"comment-" + data:comment.id'>
<a expr:name='"comment-" + data:comment.id'/>
<b:if cond='data:comment.authorUrl'>
<a expr:href='data:comment.authorUrl' rel='nofollow'><data:comment.author/></a>
<b:else/>
<data:comment.author/>
</b:if>
<data:commentPostedByMsg/>
</dt>
<dd class='comment-body'>
<b:if cond='data:comment.isDeleted'>
<span class='deleted-comment'><data:comment.body/></span>
<b:else/>
<p><data:comment.body/></p>
</b:if>
</dd>
<dd class='comment-footer'>
<span class='comment-timestamp'>
<a expr:href='"#comment-" + data:comment.id' title='comment permalink'>
<data:comment.timestamp/>
</a>
<b:include data='comment' name='commentDeleteIcon'/>
</span>
</dd>
</b:loop>
</dl>
</div>
<!--
<p class='comment-footer'>
<a expr:href='data:post.addCommentUrl' expr:onclick='data:post.addCommentOnclick'><data:postCommentMsg/></a>
</p>
-->
<!-- jackbook.com part 1 ends -->
<!-- actually i almost do nothing with your template, just add that comment, you did it :) -->
<div id='comment-parent' onmouseover='showcomment("hoverme", "comment-child");' style='margin-bottom: 50px;'>
<h3 id='hoverme' style='display:block;'>
<img alt='Your cOmment"s Here! Hover Your cUrsOr to leave a cOmment.' src='http://img229.imageshack.us/img229/5559/htmlcodeleavecommentfi5.gif' title='Your cOmment"s Here! Hover Your cUrsOr to leave a cOmment.'/>
</h3>
<!-- this iframe below is your comment form. you can change the height, or add more style property into it -->
<div id='comment-child' style='border:none; display: none; height:750px; width: 440px; margin-bottom: 5px; background: #fff none; border: 1px solid #FCO;'>
<iframe expr:src='data:post.addCommentUrl' height='100%' scrolling='yes' style='border:none;' width='100%'/>
<br/>
<a href='http://www.jackbook.com/2007/06/how-to-make-readers-leave-comment.html' title='Want to have this on your blogger/blogspot?'>Comment Form under post in blogger/blogspot</a>
</div>
<!-- end of iframe -->
</div>
</b:if>
<div id='backlinks-container'>
<div expr:id='data:widget.instanceId + "_backlinks-container"'>
<b:if cond='data:post.showBacklinks'>
<b:include data='post' name='backlinks'/>
</b:if>
</div>
</div>
</div>
</b:includable>
<!-- www.jackbook.com -->
<!-- this to hide and show el -->
<script languange='javascript'>
function showcomment(a,b){
var jackbookdotcom = document.getElementById(a);
jackbookdotcom.style.display = 'none';
jackbookdotcom = document.getElementById(b);
jackbookdotcom.style.display = 'block';
}
</script>
<!-- www.jackbook.com -->
<span class='post-comment-link'>
<b:if cond='data:blog.pageType != "item"'>
<b:if cond='data:post.allowComments'>
<a class='comment-link' expr:href='data:post.addCommentUrl' expr:onclick='data:post.addCommentOnclick'>
<b:if cond='data:post.numComments == 1'>1
<data:top.commentLabel/><b:else/><data:post.numComments/>
<data:top.commentLabelPlural/>
</b:if></a>
</b:if>
</b:if>
</span>
<span class='post-comment-link'>
<b:if cond='data:blog.pageType != "item"'>
<b:if cond='data:post.allowComments'>
<a class='comment-link' expr:href='data:post.url + "#comments"' >
<b:if cond='data:post.numComments == 1'>1
<data:top.commentLabel/><b:else/><data:post.numComments/>
<data:top.commentLabelPlural/>
</b:if></a>
</b:if>
</b:if>
</span>
文章參考:
輕鬆擴充 Blogger 功能: Blogger_ext2.js (jQuery way)!
部落格會笑了!Blogger Smiley!
blogger_ext2.js 加速篇–全面換用Google Code
blogger_ext2.js 0.6 版本發表
自由選擇你想安裝blogger_ext2的功能
blogger_ext2.js 0.6.1 版本發表
更勁爆的「超級無腦安裝Blogger外掛功能」
blogger_ext2.js 0.6.2 版發表
blogger_ext2.js 0.6.3 / 0.7.2 修正版發表